Home Assistant Setup Part 2
In part 1, I covered how I installed Home Assistant in a VM on my Proxmox server. In this post we will update that installation to enable SSH access and add a custom SSL Certificate.
SSH Access
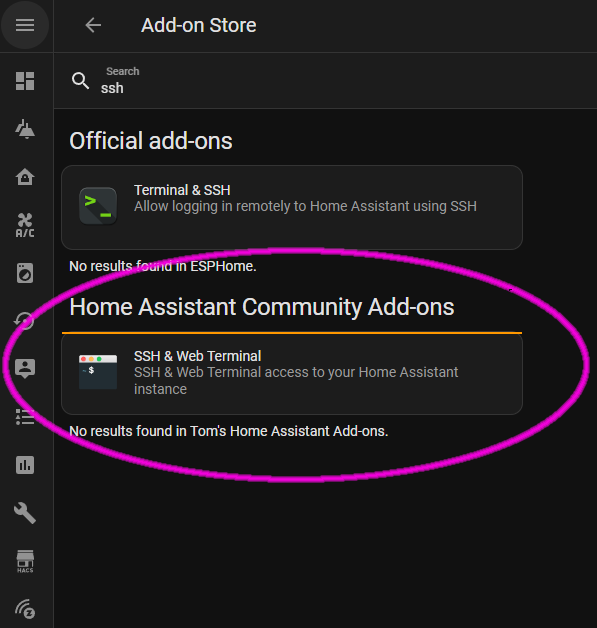
There is an “official” ssh add-on, but the community add-on has additional features and includes a web-based console to log in via the Home Assistant front end.
Under Settings > Add-ons, click the “ADD-ON STORE” Button. In the search box, type “ssh” and install the “SSH & Web Terminal” from the Community Add-ons.
Under the Add-on settings, I added my public SSH key:
allow_agent_forwarding: false
allow_remote_port_forwarding: false
allow_tcp_forwarding: false
authorized_keys:
  - >-
    ssh-ed25519
    AAAA************************************************************ahja
    eddsa-key-20211203
compatibility_mode: false
password: ""
sftp: false
username: hassio
I also changed my port off the default 22
When selecting the add-on from the list, on the “Info” page there is a toggle switch to “Show in sidebar”. This will add it to your sidebar menu so you can jump into a shell easily. Alternatively, from that same page is a link to “OPEN WEB UI” that will do the same thing if you don’t want this in your menu all the time and don’t mind a few extra clicks to get to this page. With my SSH key added I typically just log in through PuTTY or another SSH client.
SSL Certificate
Manual certificate installation
SCP or SFTP your certificate chain and private key to the Home Assistant server/VM. Place these in /ssl (also accessable via the link at /root/ssl).
Update the configuration.yaml file with the following lines:
http:
  ssl_certificate: /ssl/fullchain.pem
  ssl_key: /ssl/privkey.pem
Change the file names to whatever you named your certificates.
Restart Home Assistant.
Automating certificate updates
There is an add-on to create certificates via Let’s Encrypt. You will either need to expose port 80 to the internet or leverage one of the supported DNS providers.
Neither of those may be an option or appealing to you. Option B would be to install Certbot, acme.sh, or any ACME client on the Home Assistant server and follow the client directions to create a certificate and ensure it is placed in the location specified in your configuration.yaml as noted above. You also need to ensure Home Assistant is restarted after certifcate updates.
Option C: I already have an automated way to generate a wildcard certificate for my domain using acme.sh in a container on my Proxmox host. (see this post for details). I added deployment of the certificate via that installation as follows.
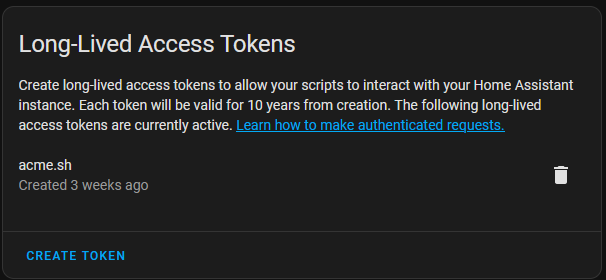
First you’ll need an API key for Home Assistant to be able to restart after pushing updated certificates. Log in to Home Assistant’s web console and select your profile. At the bottom is “Long-Lived Access Tokens”. Create one and save it someplace safe.
Log in to the container that runs acme.sh. If you followed my guide, my container runs acme.sh 5 minutes after starting and shuts downs 10 minutes after that. To make updates like this to the container, I start the container then immediately kill the acme script that is sleeping in the background.
Execute the following command, updating it with your Home Assistant IP address, API Token, and domain/certificate name:
export DEPLOY_SSH_SERVER="{HOME ASSISTANT IP ADDRESS}:22"
export DEPLOY_SSH_USER="hassio"
export DEPLOY_SSH_KEYFILE="/ssl/privkey.pem"
export DEPLOY_SSH_CERTFILE="/ssl/cert.pem"
export DEPLOY_SSH_CAFILE="/ssl/chain.pem"
export DEPLOY_SSH_FULLCHAIN="/ssl/fullchain.pem"

export DEPLOY_SSH_REMOTE_CMD='curl -X POST -H "Authorization:Bearer {InsertAPIToken}" https://localhost:8123/api/services/homeassistant/restart'

acme.sh --deploy -d *.theharps.cloud --deploy-hook ssh
Now every time acme.sh requests a new certificate it updates Home Assistant and calls the API to restart it.