Roborock S7 Vacuum
As noted in my previous post, while most of my home automation projects have provided some learning opportunities and have been enjoyable, not all of them have proven to be particularly useful or impactful. I purchased the Roborock S7 (amazon) and its auto-empty dock a little over one year ago. We have been extremely pleased with this particular little robot. My wife, who is generally indifferent to most of my automation projects, continues to remind me even after a year of how much she appreciates me purchasing and setting this up. (Reminder: I receive no credits nor incentives for reviews or links).
This little vacuum has run in our house almost every night for over a year. I believe that frequency is what has truly shines. We have a border collie/lab mix (his coat is more lab) and mostly hard wood floors on our main floor. When we vacuumed once a week, it would stay clean, but you could start to tell it was time for another manual vacuum run. Running a robot every night our house now looks like we must have just vacuumed that day or the day before to any visitors.

A side benefit is behavioral. With this vacuum we now take a brief moment every evening to pick up around the house and make sure the floor is ready. This really only takes about 5 minutes and has become a family habit that we should have done before the vacuum, but just wasn’t as consistent.
To keep a robot vacuum working well, I highly recommend running it every night/day or every other night. It does great keeping the floor maintained, but I do not think it would work well if we let the dog hair pile up and have it try to take care of a week’s worth of shedding.
I was skeptical about the mopping ability for this vacuum, but it actually works really well for small jobs. We do not use that regularly, but any day the toddler has had a handful of spills, we throw the mop attachment on for the night’s run, and it ensures we didn’t miss any sticky spots.
Purchasing tip: When I purchased this over a year ago, I bought the vacuum and auto-empty base separately rather than the bundle. At the time, the bundle cost the same amount as purchasing them separately, but with the separate purchase I received a charging base with the vacuum as well. I have never used the charging base, so this may not be much of a tip. However, I feel if the auto-empty base ever has issues, I at least have a backup base particularly if the auto-empty base is sent in for warranty repairs. Additionally, this extra base may be useful for use on multiple floors.
Setup the vacuum
Follow the vacuum instructions, except for the app installation. The instructions will tell you to install the Roborock app. Instead you should install the “Mi Home” App ( Google Play or Apple Store ).
This is not a 3rd party app, but is also provided by Xiaomi Inc., the company that makes Roborock.
You need the Mi Home app instead of the Roborock App to access the api token.
After adding the vacuum to the Mi Home app and connecting it to wifi, enter the app settings / Manage Maps, enable Map Saving.
The first run is when the robot will make a map of your floor plan, so run that as soon as you can.
- I recommend doing a good manual vacuuming beforehand. I think this vacuum is great at maintaining the floor, but to keep it in top shape I didn’t push it’s limits with a week or more of dog hair on the floor.
- Pick up/clear out as many obstacles as possible. The robot is very smart about getting around or in and out of places, but for the first run creating the map, it is better to give it a good view of the rooms.
- Create obstacles to prevent the robot from going places you don’t want. Anything tall enough and mildly heavy enough for the robot not to push around can be placed to block it. Of particular note for me was a bunch of power and other cords on the floor behind my TV center. After the map is created, you can update that with a red/no-go zone so that you don’t have to leave your manual barrier in place.
Integrating with Home Assistant
First, you need to extract your API token. There is a handy open-source project just for this purpose here.
In Home Assistant, add the Xiaomi Miio integration. Enter your app credentials, the IP address of your robot on your wifi, and the token extracted with the above tool.
In the Home Assistant Community Store (HACS) install the Xiaomi Cloud Map Extractor.
Restart Home Assistant.
Modify the following and add to your configuration.yaml
Your room numbers will be different. I found the right room numbers through trial and error of just changing colors and seeing what happened on the map. There is likely an easier/programmatic way, but that was quick and only has to happen once unless I delete the map, so I didn’t dig into an alternative. Note the secret value references and update your secrets.yaml with the correct values.
camera:
  - platform: xiaomi_cloud_map_extractor
    host: !secret xiaomi_vacuum_host
    token: !secret xiaomi_vacuum_token
    username: !secret xiaomi_cloud_username
    password: !secret xiaomi_cloud_password
    country: "us"
    draw: ['all']
    room_colors:
# Laundry Room
      1: [240, 178, 122]
# Foyer
      16: [240, 178, 122]
# Living Room
      17: [84, 153, 199]
# Music Room
      18: [72, 201, 176]
# Kitchen
      19: [72, 201, 176]
# School Room
      20: [84, 153, 199]
    attributes:
      - calibration_points
Restart Home Assistant.
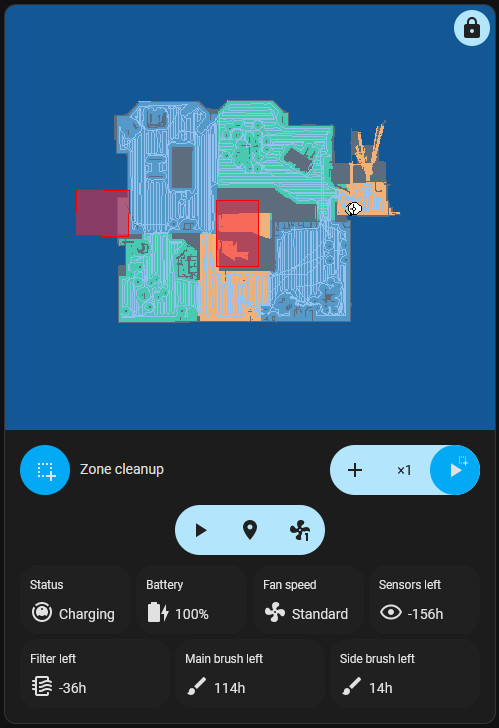
From the HACS frontend section, install Xiaomi Vacuum Map. Reload the browser when prompted.
Under Settings > Dashboards > (Triple Dot Menu) > Resources, add resource:
- URL:
/hacsfiles/lovelace-xiaomi-vacuum-map-card/xiaomi-vacuum-map-card.js - Type:
JavaScript Module
Save, then refresh your browser
On any Lovelace dashboard you can now click Add Card > Search for “Xiaomi”